Rock Cleaning and Polishing Techniques for the Winter Season

Are your rock finds gathering dust on a shelf? Winter is the perfect time to give them the love they deserve! With the chill in the air, rock enthusiasts can turn their attention to indoor projects that bring out the hidden beauty of their collections. This fun and insightful guide will show you simple and effective rock-cleaning techniques and how to polish rocks at home to make them sparkle. Whether you're a seasoned rockhound or just starting, this guide has you covered!
Why Clean and Polish Rocks in Winter?
Winter offers a unique opportunity for rock enthusiasts. While the outdoors may be too cold for hunting, it's the ideal time to focus on the treasures you've already collected.
- Reveal Hidden Beauty: Many rocks and crystals look dull at first glance. Cleaning and polishing them can uncover dazzling colors and patterns.
- Protect Your Finds: Dirt, grime, and minerals can damage rocks over time. Regular cleaning ensures they stay in great shape.
- A Relaxing Hobby: Cleaning and polishing rocks can be a calming activity, perfect for long winter evenings.
Don't let your collection sit forgotten-get started and rediscover the excitement of rockhounding indoors. Your shiny finds will have your friends wishing they could start collecting too!
Supplies You'll Need
Before you begin, it's important to gather the right tools. Luckily, most supplies for rock cleaning and DIY rock polishing at home are inexpensive and easy to find.
Basic Cleaning Supplies
- Soft Brushes: Great for removing surface dirt. Toothbrushes work well!
- Mild Soap and Water: A simple solution for most cleaning needs.
- Old Toothpicks or Wooden Sticks: Perfect for cleaning small crevices.
- Towels and Sponges: For drying and scrubbing rocks gently.
Polishing Tools
- Sandpaper: You'll need various grits, from coarse (80 grit) to very fine (1500+ grit).
- Rock Tumbler: A must-have for serious polishers. Tumblers smooth and shine rocks effortlessly.
- Polishing Compound: Used to add that final sparkle.
Specialized Supplies for Crystals and Gems
- Vinegar or Baking Soda: Helps clean mineral deposits off quartz and other crystals.
- Ultrasonic Cleaner: Perfect for delicate gems and crystals.
- Gloves and Safety Glasses: Always wear protective gear when handling chemicals.
Pro tip: Check your local hardware store for supplies or browse online for deals. If you're just starting, keep it simple-you can always upgrade your tools later.
Cleaning Techniques for Rocks and Crystals
Cleaning your rocks is the first step toward making them shine. Here's how to do it safely and effectively:
1. Start with a Basic Wash
- Rinse Your Rocks: Under warm water to remove loose dirt.
- Use a Soft Brush: (like a toothbrush) to scrub gently.
- Add Mild Soap: For stubborn grime, and soak the rocks for 15-20 minutes if needed.
Tip: Never use soap on delicate stones like turquoise-it can ruin their natural luster.
2. Remove Tough Stains and Deposits
- For Hard Rocks: Use a mixture of vinegar and water (equal parts) to dissolve mineral deposits. Soak for up to 30 minutes, then scrub.
- For Fragile Crystals: Avoid harsh chemicals. Instead, use plain water or an ultrasonic cleaner.
3. Handle with Care
- Examine Your Rocks: Check for cracks or weak spots.
- Use Toothpicks: Or small wooden tools to clean crevices.
- For Delicate Crystals: Pat dry instead of rubbing to prevent scratches.
Cleaning may seem simple, but it's a key step that ensures your rocks are ready for the polishing process.
Polishing Techniques to Enhance Shine

Now for the fun part-making your rocks gleam like treasures! Polishing is where you can turn ordinary finds into dazzling gems.
1. Hand Polishing (No Machines Needed!)
If you don't have a rock tumbler, don't worry-you can polish by hand!
- Start with Coarse Sandpaper: (80-120 grit) to remove rough edges.
- Use Finer Grits: (400, 800, and 1500 grit) to smooth the surface.
- Finish with Polishing Cloth: Use a polishing compound for a glossy finish.
Hand polishing is perfect for beginners or anyone who loves the meditative process of working with stones.
2. Using a Rock Tumbler
A rock tumbler is a game-changer for polishing multiple stones. Here's how it works:
- Place Your Rocks: And grit (a type of sand) into the tumbler barrel.
- Add Water: Seal the barrel, and start tumbling.
- Check Progress: Every few days and switch to finer grits until the rocks shine.
Tumblers are great for polishing stones like agates, quartz, and jasper. If you don't own one yet, consider starting with an affordable model.
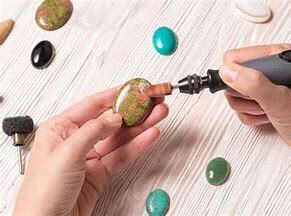
3. Rotary Tools for Precision Polishing
For intricate or high-quality pieces, a rotary tool (like a Dremel) is ideal.
- Attach a Buffing Wheel: Or polishing pad to the rotary tool.
- Apply Polishing Compound: Gently buff the rock's surface.
- Work in Small Sections: For the best results.
This method is perfect for larger crystals or unique shapes that need extra care.
Display and Storage Tips for Winter
After all that hard work, you'll want to show off your shiny rocks! Here are some creative ideas:
- Indoor Displays: Arrange polished rocks in bowls, jars, or on shelves to brighten up your space.
- Label Your Finds: Write down where you found each rock-this makes your collection even more special.
- Store Safely: Use padded boxes to protect delicate stones from scratches.
Sharing your polished rocks with friends and family can inspire others to join in the fun of rock collecting.
Why Wait? Start Polishing Today!
Winter is the perfect time to dive into the world of rock cleaning and polishing. Whether you're a beginner or an experienced collector, these simple techniques will help you transform your finds into beautiful pieces you'll treasure forever.
Ready to learn more about rockhounding? Visit Rockhounding.org to discover expert tips, guides, and a community of fellow enthusiasts. Don't miss out on the joy of uncovering nature's hidden gems-your next adventure awaits!
